
Lego Art & Design Principles 210
Page 3 of 4 •  1, 2, 3, 4
 ![]()
Re: Lego Art & Design Principles 210
![]() by Rook Thu Apr 08, 2010 2:41 pm
by Rook Thu Apr 08, 2010 2:41 pm
Troopa Daisy wrote:Very helpful Rook. Thanks a lot!
Do you think you could make a tutorial on making cockpits for planes too?
Already planning on it. I'll do a simple little snub fighter. From classic space probably. I haven't done any Neo-Space yet and I'm looking forward to building one.
Tital Wave wrote:Thanks Rook. This helped with my door design. What did you mean by "Paintbrush" Though? An image editing program?
Yeah, adding a pinstripe to anything pretty much will give an added depth to a MOC. Not only physically but visually.

Rook- The Doctor

- Location : Ontario

-

Re: Lego Art & Design Principles 210
![]() by eclipsegrafx Thu Apr 08, 2010 4:52 pm
by eclipsegrafx Thu Apr 08, 2010 4:52 pm

eclipsegrafx- VIP Former Staff

- Location : internet

-
Re: Lego Art & Design Principles 210
![]() by Jedi Joe Fri Apr 09, 2010 3:02 am
by Jedi Joe Fri Apr 09, 2010 3:02 am
I'd also like to say that if you're going for a worn down look, putting regular studded plates and grills in the place of a few tiles really helps. And since Star Wars shows advanced civilizations that aren't necessarily shiny and clean, it would work for SWU-related vigs.

Jedi Joe- Guild Member

- Location : Florida, the state of neverending heat and humidity...
Re: Lego Art & Design Principles 210
![]() by Rook Fri Apr 09, 2010 2:11 pm
by Rook Fri Apr 09, 2010 2:11 pm

Rook- The Doctor
- Location : Ontario
-
Re: Lego Art & Design Principles 210
![]() by The 58th Legion Sat Apr 10, 2010 9:52 am
by The 58th Legion Sat Apr 10, 2010 9:52 am
 . However I havn't done any swooshability tests or anything with the gun ship because i'm terrifyed it will break and land in the pile of lego i've got on my desk, where the piece's will never be seen again (figure of speech). Oh and thanks Rook this was very helpfull. [b] 3 flat 2x4 plates make a 2x4 brick.
The 58th Legion- Non-Guild Member

- Location : Sparta.

A little help...
![]() by RubbahBand Wed May 19, 2010 12:02 am
by RubbahBand Wed May 19, 2010 12:02 am
I want to become a better builder and I cannot become a better builder at all as I have yet to learn many things.
So anyways here is my main question:
"Could anyone help me with learning new Lego Techniques"
This question does not involve SNOT.
If anyone can help me this would be great.
Might I add that I never get any comments on my creations so I don't know how to improve them at all...
This is why I have posted this thread.

RubbahBand- Guild Member
- Age : 28
Location : Haunting CABG
-
Re: Lego Art & Design Principles 210
![]() by Tac Wed May 19, 2010 8:58 am
by Tac Wed May 19, 2010 8:58 am


Tac- Bley Junkie

- Age : 27
-
Re: Lego Art & Design Principles 210
![]() by PhiMa Wed May 19, 2010 1:43 pm
by PhiMa Wed May 19, 2010 1:43 pm

PhiMa- VIP Former Staff
- Age : 30
Location : A little east of boring and north of lame.

-
Re: Lego Art & Design Principles 210
![]() by Rook Wed May 19, 2010 2:46 pm
by Rook Wed May 19, 2010 2:46 pm
One the best things to do is to challenge your mind.
I posted this in the Art & design thread but I think would help more builders if they actually tried it. Next time you buy a set (50-200 pieces) don't look at the instructions. Just look at the picture and see if you can build it. This forces your mind to understand the need for each piece, its shape, and function. Most likely you'll end up with a piece or two that you can't figure out then you can shred the set and follow the instructions. Even taking an old set that you haven't built in about 6-12 months and try doing this.
Then of course there's the obvious look closely at what other people are building study what pieces they've used to make specific shapes. Then build what they did. Aka steal/borrow/learn their technique. I'll post some images in a bit as examples.
Edit:
http://www.brothers-brick.com/ Flickr Pool
--------------------------------------------------------------

Note how they've used sloped pieces to create text and graphic lines in a single plane of text.
--------------------------------------------------------------

I also covered this in the Art & Design Threads: Color choice!
--------------------------------------------------------------
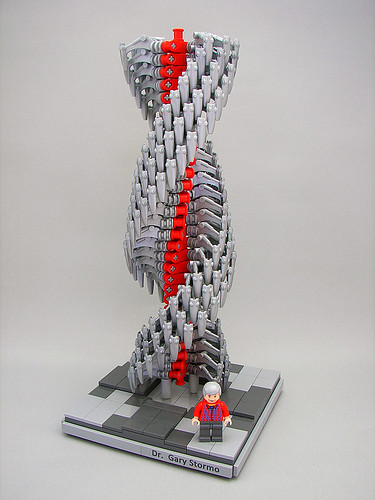
Repetition. Sometime taking a very simple element or small group of element and repeating them has a huge effect.
--------------------------------------------------------------

Purposeful greebles. Greebling on plate and putting a minifigure on top of it is pointless. Have purpose for your greebles.
--------------------------------------------------------------
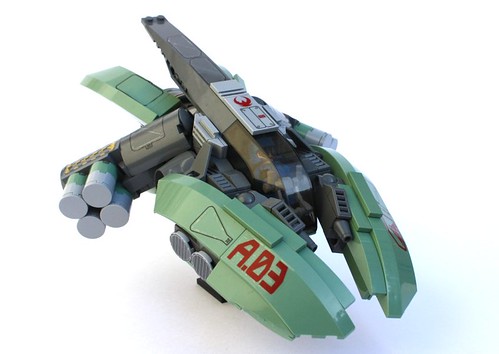
Finally building on an angle. Hinges and slopes are your friends when it comes to building SciFi.
Last edited by Rook on Tue Dec 14, 2010 4:05 pm; edited 4 times in total
Rook- The Doctor
- Location : Ontario
-
Re: Lego Art & Design Principles 210
![]() by Tac Wed May 19, 2010 3:06 pm
by Tac Wed May 19, 2010 3:06 pm
Tac- Bley Junkie
- Age : 27
-
Re: Lego Art & Design Principles 210
![]() by Guest Wed May 19, 2010 5:11 pm
by Guest Wed May 19, 2010 5:11 pm

Guest- Guest
Re: Lego Art & Design Principles 210
![]() by Rook Wed May 19, 2010 7:53 pm
by Rook Wed May 19, 2010 7:53 pm
The_Customizer wrote:Wow! I wish I had found this page months ago! This is wonderful, thanks for all the technique ideas!
 'oh: I talk about it all the time! And there's another one too.
Rook- The Doctor
- Location : Ontario
-
Re: Lego Art & Design Principles 210
![]() by Guest Wed May 19, 2010 8:06 pm
by Guest Wed May 19, 2010 8:06 pm
Rook wrote:The_Customizer wrote:Wow! I wish I had found this page months ago! This is wonderful, thanks for all the technique ideas!
Really? Where is it?
I don't think I have ever heard you say anything about this place....
Guest- Guest
Re: Lego Art & Design Principles 210
![]() by Rook Wed May 19, 2010 8:27 pm
by Rook Wed May 19, 2010 8:27 pm

Here. Search box!
http://www.thecabg.net/decals-and-techniques-f10/lego-art-design-principles-101-t207.htm
Rook- The Doctor
- Location : Ontario
-
Re: Lego Art & Design Principles 210
![]() by Tac Wed May 26, 2010 8:15 pm
by Tac Wed May 26, 2010 8:15 pm
A lot of people seem to love my hardsuits and walkers, so I thought I'd just go through what I do.
1. The Beginning
To be honest, most of my builds never turn out the way I planned. I never draw pictures or write down ideas, I just build. I get a general idea of what I want to build, chunky hardsuit, tall and thin mecha, etc. I then go on Flickr and look at some MOCs. Now I do the three Ss Search them. Just search Lego Mecha, Hardsuit or Walker on Flickr and you'll see hundreds of amazing creations. Find 2-4 which suit the creation you've planned, if you're making a huge chunky mecha than pick three mecha you really like. Study them. Work out what joints they've used, different gun designs, stuff like that. Steal them. Pick some techniques you like and use them in your creation. People steal ideas all the time, just like artists and writers. Now we've got a plan, inspiration and techniques we can start building.
2. The Sexy legs
The main bit of all three different types of MOCs are the legs. I always start with the legs or feet, after them the rest just grows. By now you should have an idea of what you're doing, don't build long fragile legs for a huge chunky walker. Here's a couple of legs I've used:

I've used really detailed legs here. They've got a lot of joints so they can be posed in a variety of different ways. The joints are strong and the feet are big, both of these things hold it all up. The legs suit the MOC well, they look like they've been built from scratch and have a perfect apocalypse type look.

These are the legs for a mecha I'm working on at the moment. They look industrial and would suit some military or loader mecha. The stickers add some extra detail the legs would lack without them. The legs have hardly any movement, but the mecha is suppose to be a statuette, display, not play. The feet are way too small and need enlarging so they don't look out of place.

The frame for these legs is by CT44, this is a good example of stealing something and using it yourself. The legs are super chunky and fit well with the rest of the walker. They can move so they can pose in a MOC.

These legs are very simple and 'clean'. They're thin and only have a bit of detail inside the legs. They match the simple look of the walker and look like they're about to pounce and sprint after the enemy. The joint is simple, strong and is very poseable.

This is just an example of how you can pose them, looks are a huge part in a MOC, but playability adds a little bit extra and can lead to some awesome shots/poses.
3. Up, Up and Away!
At this stage your MOC starts to take a real shape and character, you're beginning to build the body. Each type of MOC has a different body. Walkers, some hardsuits and some mecha have a space for a figure with some weapons either side, but other mecha and hardsuits have arms. Try to match your legs, clean sleek legs need a smooth sleek body to match. Controls are also a big
. They're a very nice detail that loads of builders like. Any smaller details also really stand out too, stickers or a interesting texture. The body, being the centre of the MOC needs 2-5 connection points depending on what you're building. Racing mechas and some walkers only need 2 connection points for the legs. These need to be the strongest, if they're loose the body will tip forward and look like a nurse id about to inject his arse. Hardsuits and some mecha need 2 more, for the arms for weapons. If you're having huge arms and heavy guns this connection also needs to be strong, otherwise they'll fall down. Some mecha also need 5 connection points in total for the arms, legs and head. The legs, arms, weapons and head should be able to move as much as possible.4. Arms/Weapons
Arms and weapons won't apply to all types of walkers, hardsuits and mecha. If you plan on building a racing walker with no guns or arms then just skip this bit. If you are building guns and arms then feel free to read on. The arms can be quite simple to do, all you need is a good connection. Clips, hinges or ball joints work well for this. The arms on the first picture I posted are very simple. They're basically battle droid bodies, Travis bricks and clips. The arms need to be quite similar to the legs, but sometimes opposites can be quite nice. Huge chunky legs with small little dinosaur arms can look extremely good. Instead of arms some people prefer huge guns, missile pods and rockets. There's load of good rocket and gun designs out there, go steal them! If you do blatantly steal a gun design without changing it at all remember to give credit, just say: "The gun design was inspired/made by______". Of course these weapons don't have to go were the arms would, you can have rockets or guns anywhere! Just look at some of my MOCs up there, in the first one has a single gun on it's shoulder, the third has one under the cockpit and the forth has two rocket pods on the shoulders and two gun either side of the cockpit. The second one I plan to have him actually holding a gun.
5. The Head
This bit only applies to unmanned mecha. They all need some type of antenna and eyes. Some mecha have a trans stud (Eye) in the body, others have a head. It's completely up to you what you want to do. There's plenty of inspiration on Flickr, go have a look around.
6. The Finishing Touches
So you've a MOC with legs, body and maybe some arms, ahead and some weapons. Are you done? Nope. Finishing details are crucial. My favourite details are tubes in the legs or arms. Antenna's are also a nice extra, along with some small hidden weapons. Just just a look at your MOC and see what could be improved. One tip though, don't go over the top. Don't have a 6-legged, 4-armed mecha with 3 heads and guns EVERYWHERE! Simplicity is sometimes better. If you're still not happy with it post it on Flickr, "I've recently made this walker, but I still feel it could be improved, any suggestion?". There's loads of people who'll be happy to help you. When you're finally happy with it and 100% sure there's nothing else you can do to it, post it! A good MOC shouldn't take you less than 10 hours of building I would say. Some people might get one done in 5, but no less. Take your time, don't just think "Damn, I can't find that piece, I'll just use this one that looks a lot crappier." Posting some WIP pictures also helps a lot, my Alpha One is a good example of how the community can really help you turn a piece of junk into a TBB worthy creation.
Last edited by Tac on Thu May 27, 2010 7:23 am; edited 2 times in total
Tac- Bley Junkie
- Age : 27
-
Re: Lego Art & Design Principles 210
![]() by mazz Wed May 26, 2010 8:18 pm
by mazz Wed May 26, 2010 8:18 pm
I build all most the same way. 
mazz- Non-Guild Member
- Age : 30
Location : some were in CANADA
-
Re: Lego Art & Design Principles 210
![]() by Knight Wed May 26, 2010 8:21 pm
by Knight Wed May 26, 2010 8:21 pm
mazz wrote:Thanks Tac,
Same here. Sometimes I'll be working on a starfighter and it turms into a vig, or a bot.
Thanks for the info Tac! 
Knight- VIP Former Staff
- Location : Anywhere with lego.
Re: Lego Art & Design Principles 210
![]() by Troopa Daisy Wed May 26, 2010 11:32 pm
by Troopa Daisy Wed May 26, 2010 11:32 pm

Troopa Daisy- Halo Kitty

- Age : 28
Location : Vancouver, BC Canada. GO CANUCKS GO!
-
Re: Lego Art & Design Principles 210
![]() by Hazard with a Glove Thu May 27, 2010 12:04 am
by Hazard with a Glove Thu May 27, 2010 12:04 am
I can't wait to see the rest. I am not very good with mechas, hardsuits and walkers because I always have difficulties with the laegs.

Hazard with a Glove- Guild Member
- Age : 27
Location : Once upon a time, in a magical forrest....
Re: Lego Art & Design Principles 210
![]() by Tac Thu May 27, 2010 7:23 am
by Tac Thu May 27, 2010 7:23 am
Tac- Bley Junkie
- Age : 27
-
Re: Lego Art & Design Principles 210
![]() by Rabid Squirrel Fri May 28, 2010 4:58 am
by Rabid Squirrel Fri May 28, 2010 4:58 am

Rabid Squirrel- Guild Member
- Location : here
Re: Lego Art & Design Principles 210
![]() by Tac Fri May 28, 2010 7:52 am
by Tac Fri May 28, 2010 7:52 am
Rabid Squirrel wrote:One quick question, what is a Travis brick?
It's a nickname for THIS piece.
Tac- Bley Junkie
- Age : 27
-
Re: Lego Art & Design Principles 210
![]() by CowsRTasty Fri May 28, 2010 10:26 pm
by CowsRTasty Fri May 28, 2010 10:26 pm
CowsRTasty- Non-Guild Member
- Age : 29
Location : Maryland
Re: Lego Art & Design Principles 210
![]() by Rook Tue Dec 14, 2010 3:52 pm
by Rook Tue Dec 14, 2010 3:52 pm
Image by L D M

Jumbo Image
Rotated squares
Each set of 4 dots represents the corners of a rotated square that can be placed on them, with exact stud measurements.
The first and second numbers represent the distance between each corner -- i.e., for blue, each round plate is over 3 and across 4 studs. The third number represents the hypotenuse -- in this case, the length (in number of studs on a side) of each side of the corresponding square with its corners on those points.
Blue: 3 - 4 - 6
Lime: 6 - 8 -11 [3 - 4 - 6]
Dark Red: 5 -12 -14
Tan: 9 -12 -16 [3 - 4 - 6]
Yellow: 8 -15 -18
Orange: 12 -16 - 21 [3 - 4 - 6]
Pink: 7 - 24 - 26
Silver: 15 - 20 - 26 [3 - 4 - 6]
Gold: 10 - 24 - 27 [5 - 12 - 14]
Red: 20 - 21 - 30
Black: 18 - 24 - 31 [3 - 4 - 6]
Brown: 16 - 30 - 35 [8 - 15 - 18]
White: 12 - 35 - 38
There are two sets of each color (1 set of 1x1 round plates, 1 set of other bricks); these are enantiomorphic, with the same Pythagorean triple.
The set of numbers in brackets denote multiples of the respective triples, meaning that those squares, while being larger, will be rotated at the same angle.
Rook- The Doctor
- Location : Ontario
-
Re: Lego Art & Design Principles 210
![]() by LiquidHerO Mon Jul 30, 2012 5:03 pm
by LiquidHerO Mon Jul 30, 2012 5:03 pm
For example, 16 x 16 x 16 is that 16 studs high?

LiquidHerO- Non-Guild Member
-
Page 3 of 4 • 1, 2, 3, 4 ![]()
» Bubble turret design
» LEGO LEGO Logo
» Bulkhead Design
» [SW] New 762nd Design