
GIMP/Photoshop Thread
Page 7 of 37 •  1 ... 6, 7, 8 ... 22 ... 37
 ![]()
Re: GIMP/Photoshop Thread
![]() by Sialboats Sun Aug 23, 2009 11:47 pm
by Sialboats Sun Aug 23, 2009 11:47 pm
So, you take your fellow you want with a gaping, bloody hole in his body, and crop/perspective him into position. Go ahead and de-saturate him (apply grayscale) and colorize/color balance our target to your choice of color. I chose green, in this case - seeing as it's easily identifiable as a military-night-vision-majigger color. Everybody would assume it was some sort of optics package, even if you left it bereft of the detail that you're going to give it later. You don't necessarily even have to colorize it, but you should apply other changes so it appears as though you're looking through a lens. GIMP has two major lens features, one in Lighting And Shadows, and one in Distorts. Apply some noise of your choice, making the subject seem appropriately obfuscated by the technology's deficiencies.

Make a transparent layer, and go ahead and airbrush a black circle around him. The reason why I like a separate layer is so that if you make a mistake, it's easily rectified by erasing the malformed portion of the work off, instead of having to re-do all work removed by the undo. It also allows you to move the layer over the desired area of vision if you don't like the one you started with. If you do the aforementioned, don't forget to crop any cut-off corners out of the image.
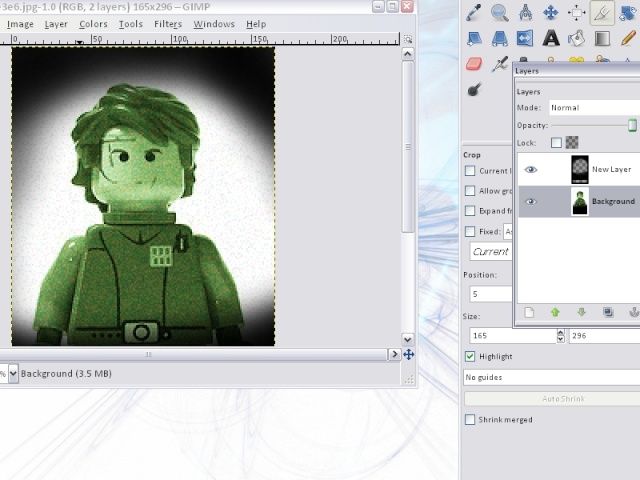
Now you could do just two black lines intersecting one another, pathed onto the picture; but we want something with a little more detail than that

Go ahead and play around with your layers, colorize the paintbrushed lines and the text, add a nice laser sight if your sniper's murdering machine is outfitted with one, and don't forget to add some more distortion to the layers you've added to make it seem believable.
And in no more than five minutes, you've GIMPed up a splendid ticket to hell for your mortal foe


Sialboats- Non-Guild Member

- Location : Florida, United States

-

Re: GIMP/Photoshop Thread
![]() by Alpha Mon Aug 24, 2009 12:03 am
by Alpha Mon Aug 24, 2009 12:03 am
I'm too lazy to translate the Aurebesh, what's it say?

Alpha- Non-Guild Member
- Age : 28
Re: GIMP/Photoshop Thread
![]() by Zepher Mon Aug 24, 2009 1:48 am
by Zepher Mon Aug 24, 2009 1:48 am

Zepher- VIP Former Staff

- Age : 30
-
Re: GIMP/Photoshop Thread
![]() by Jens Mon Aug 24, 2009 2:29 pm
by Jens Mon Aug 24, 2009 2:29 pm
Zepher wrote:How do you get Aurebrush too? I can't find it anywhere. I feel liek you guys have WAY more tools then me.
That's because we do.
http://www.galacticempire.net/fonts/

Jens- Non-Guild Member
- Location : Denmark

-
Re: GIMP/Photoshop Thread
![]() by Bizzle Mon Aug 24, 2009 4:38 pm
by Bizzle Mon Aug 24, 2009 4:38 pm
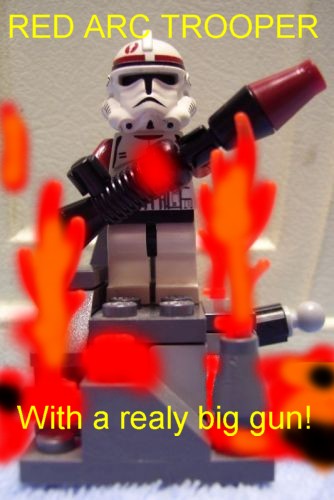
I need help with making lights glow. I can't find supernova anywhere. Is it a add on? Or is there another way to make lights look like they are glowing?
I would also like to know how sial does that smoke/fire that was seen in the 541st Chronicles when the gunner is shot off of the speeder bike thing.
Any help/tutorials would be awesome.
Bizzle- Guild Member

- Age : 30
Location : here..I think...
Re: GIMP/Photoshop Thread
![]() by CloneCommando66 Mon Aug 24, 2009 7:21 pm
by CloneCommando66 Mon Aug 24, 2009 7:21 pm

CloneCommando66- Non-Guild Member
- Age : 30
Location : Why?I need to know that???

Thunder-blade- Thunder-Sharpie

- Age : 29
Location : A galaxy far, far away...
-
Re: GIMP/Photoshop Thread
![]() by Bizzle Mon Aug 24, 2009 7:31 pm
by Bizzle Mon Aug 24, 2009 7:31 pm
Thunder-blade wrote:0.o
Sial made a tutorial.
I know I was shocked too....
If only he would help me with my requests!....
I am going to have to use that in the future sial. Very awesome.
Bizzle- Guild Member
- Age : 30
Location : here..I think...
Re: GIMP/Photoshop Thread
![]() by Dutch Tue Aug 25, 2009 2:08 am
by Dutch Tue Aug 25, 2009 2:08 am
 Also did I add to many flames ?

Dutch- Guild Member
- Age : 29
Location : Arizona
-
Re: GIMP/Photoshop Thread
![]() by Thunder-blade Tue Aug 25, 2009 2:09 am
by Thunder-blade Tue Aug 25, 2009 2:09 am
Thunder-blade- Thunder-Sharpie
- Age : 29
Location : A galaxy far, far away...
-
Re: GIMP/Photoshop Thread
![]() by Darman Tue Aug 25, 2009 2:19 am
by Darman Tue Aug 25, 2009 2:19 am

Darman- Guild Member
- Age : 26
Location : America
Re: GIMP/Photoshop Thread
![]() by Thunder-blade Tue Aug 25, 2009 2:22 am
by Thunder-blade Tue Aug 25, 2009 2:22 am
I'd recommend thepaint.net...
Thunder-blade- Thunder-Sharpie
- Age : 29
Location : A galaxy far, far away...
-
Re: GIMP/Photoshop Thread
![]() by Darman Tue Aug 25, 2009 2:23 am
by Darman Tue Aug 25, 2009 2:23 am
Wait a second you can add layers in paint now?Thunder-blade wrote:To all those who can't figure out GIMP...
I'd recommend thepaint.net...
Last edited by Darman-C19 on Tue Aug 25, 2009 2:25 am; edited 1 time in total
Darman- Guild Member
- Age : 26
Location : America
Re: GIMP/Photoshop Thread
![]() by Thunder-blade Tue Aug 25, 2009 2:25 am
by Thunder-blade Tue Aug 25, 2009 2:25 am
Thunder-blade- Thunder-Sharpie
- Age : 29
Location : A galaxy far, far away...
-
Re: GIMP/Photoshop Thread
![]() by Sialboats Thu Aug 27, 2009 11:10 pm
by Sialboats Thu Aug 27, 2009 11:10 pm
Gerrard wrote:[C]ould you show me a dust tutorial if possible?You know, sort of a "Dusty Room" like in the Cantina Mos Eisley [reference] pic you showed me?
Thanks[!]
I'm just going to do a quick little tutorial on dust in general, the Supernova tool, and lighting. Don't fret, though, I haven't forgotten about that earlier glowie-object tutorial request, and it WILL BE POSTED THIS WEEK. Vendetta won't be, probably, but I'll at least get that tutorial out
Now, the biggest part of this is gradients. All colored smoke you'll be doing will most likely have to be done through gradients if you're going to be using a brush that is pre-colored. In my case, I'll be using an fire airbrush, set to a custom gradient. Custom gradients can be made by "Editing" the gradient list (accessed at the bottom of that drop-down menu), and then creating a new one. You can change gradients on any tool: paintbrushes (seen here), airbrushes, pencils, paths, anything where colors are being applied.
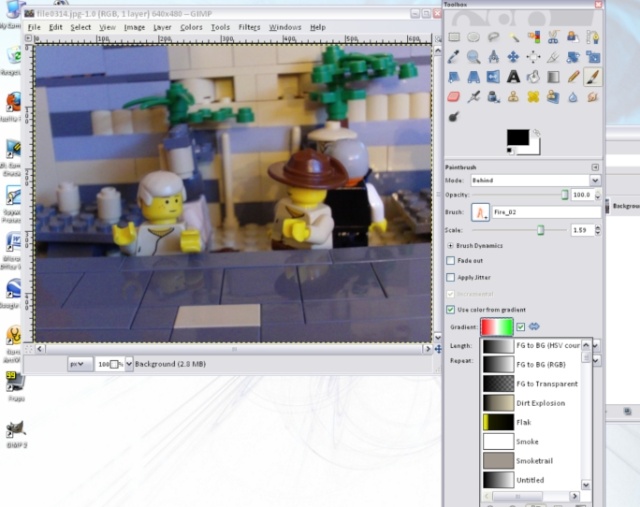
The room has to be dark, and dingy. This dilapidated, dusty structure in the Hive of Scum and Villainy didn't have brand new ilumnigrids, but grime-covered florescents, and the light that streamed in from the entrance. So let's use the lighting effects tool.
This tool has to be THE MOST useful one for environments. You can darken a setting, lighten it up, create dawn, dusk, deserts, jungles, so forth. Lighting is important, and this tool gives you some very useful options. The color can be changed, the potion can be changed, the overall luminosity, glowing potential, brightness, and other attributes can be manipulated through easy to use sliders under the "Material"'s tab. "Bump Map", and "Enviroment Map" I haven't really used in thoroughness yet, so don't worry about them.

To achieve the fullest range of light location manipulation possible, slide the distance slider to the maximum end, allowing the light to grow, but ensuring that you keep it prominently located in the center of your screen. Then, take that blue dot in the center of the sphere of light, and drag it off the map to the location you want the light to be at. This may not always work (it may crash, or it may go all blue), and if you make a mistake, you will have to set that slider back to zero and begin anew. So, it's advisable you have a pretty good idea as to where you need the point to be, prior to manipulating it's position.
Now, here I've created several transparent layers, and applied varying degrees of textured smoke and Gaussianed smoke using my airbrush, set to a fire brush (you can use just about any brush, but to different effects; diversify your brush set and experiment too!), on different layer settings (an imprecise art, as is most of this, so see what works best for your situation). "Dab" the smoke onto the layer by using brief mouse clicks. Try not to drag most brushes, and keep them large. Be warned, however: On some of the custom made brushes, downloaded from the interwebs, it's electronic suicide to put them on 10.00, as you'll hang the GIMP client due to their massive size at that scale.

Several layers later, and we arrive at the Supernova. The supernova is found under Filters/Lighting and Shadows (I think) and can be applied on any layer, on any setting, providing a wide range of results. It can be used as lights, bombs, blaster flare, sunlight, and can be applied to as many different scenarios you can conceive. In this case, I'm using it to simulate the sunlight streaming into the cantina from a nearby entrance.

I applied more layers of dust, more supernovas, and erased portions of both at my discretion. As I said before: there is not a single set way of going about this all. Just do what you feel will look the best, and work with it from there.
I overdid the smoke a little on this one, but I think it doesn't look half bad

Sialboats- Non-Guild Member
- Location : Florida, United States
-
Re: GIMP/Photoshop Thread
![]() by Commander Lukas Thu Aug 27, 2009 11:14 pm
by Commander Lukas Thu Aug 27, 2009 11:14 pm

There is only one trooper here. Same guy, two guns.
In My opinion a banner can make or break a forum, my old one was ugly ](link) This is my new one:
 [/url
[/urlPlease don't kill me.
This is the logo for an upcoming movie I and a freind are working on:
[url=https://servimg.com/view/13112264/376]

I made this for some one on FAILpages

Commander Lukas- Non-Guild Member
- Age : 29
Location : In a tank double parked in the parking lot of a Pizza Hut.
-
Re: GIMP/Photoshop Thread
![]() by Zepher Thu Aug 27, 2009 11:18 pm
by Zepher Thu Aug 27, 2009 11:18 pm
Can someone teach me how to download fonts/brushes? That would be a wonderful tutorial!
but seriously, I have no idea, and it's super annoying.
Zepher- VIP Former Staff
- Age : 30
-
Re: GIMP/Photoshop Thread
![]() by Commander Lukas Thu Aug 27, 2009 11:22 pm
by Commander Lukas Thu Aug 27, 2009 11:22 pm
Commander Lukas- Non-Guild Member
- Age : 29
Location : In a tank double parked in the parking lot of a Pizza Hut.
-
Re: GIMP/Photoshop Thread
![]() by Sialboats Thu Aug 27, 2009 11:31 pm
by Sialboats Thu Aug 27, 2009 11:31 pm
Zepher wrote:I don't have the fire brush.
Can someone teach me how to download fonts/brushes? That would be a wonderful tutorial!
but seriously, I have no idea, and it's super annoying.
Go to wherever your GIMP is downloaded, the GIMP folder where the .exe is. For me that's:
:C/Program Files/GIMP-2.0.
Once you're in the GIMP folder, your path would then look like:
/share/gimp/2.0/brushes
In the "brushes" subfolder, you download your brushes. Just plop the files in there. The next time you open up GIMP, they'll be in the brushes' dialog box, ready for your usage

Sialboats- Non-Guild Member
- Location : Florida, United States
-
Re: GIMP/Photoshop Thread
![]() by Thunder-blade Thu Aug 27, 2009 11:34 pm
by Thunder-blade Thu Aug 27, 2009 11:34 pm
My computer>Local Disk>Program Files>GIMP 2.0>Share>gimp>2.0>brushes
Thunder-blade- Thunder-Sharpie
- Age : 29
Location : A galaxy far, far away...
-
Re: GIMP/Photoshop Thread
![]() by Zepher Thu Aug 27, 2009 11:49 pm
by Zepher Thu Aug 27, 2009 11:49 pm
This is perhaps the first time that I've been in your debt three times in one day, so new record!
Can someone suggest a few brushes that I should be looking into?
Zepher- VIP Former Staff
- Age : 30
-
Re: GIMP/Photoshop Thread
![]() by Thunder-blade Thu Aug 27, 2009 11:51 pm
by Thunder-blade Thu Aug 27, 2009 11:51 pm
Thunder-blade- Thunder-Sharpie
- Age : 29
Location : A galaxy far, far away...
-

Gerrard- Guild Member
- Age : 29
Location : Somewhere to the left of the Death Star
-
Re: GIMP/Photoshop Thread
![]() by Sialboats Sun Aug 30, 2009 12:11 am
by Sialboats Sun Aug 30, 2009 12:11 am
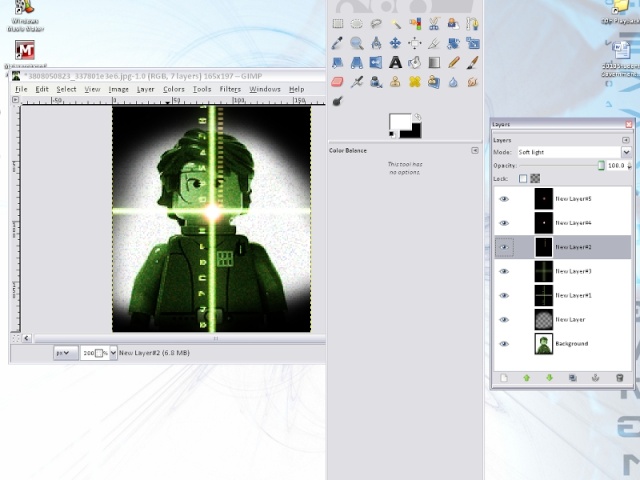
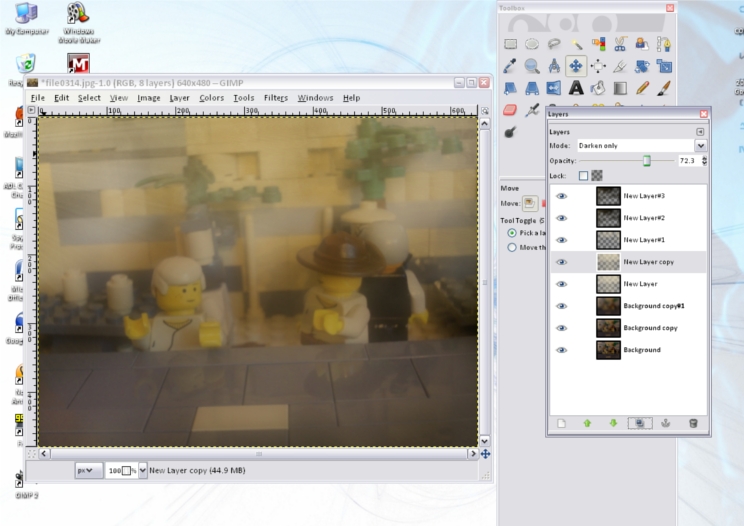
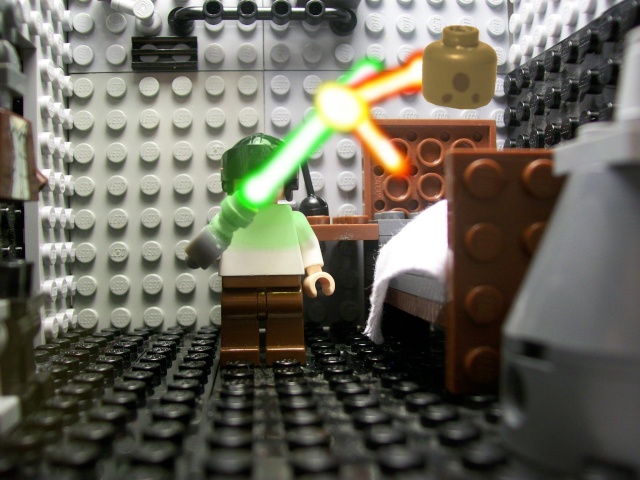
Firstly, your friend is a New Black Layer, set to SCREEN. Screen is one of the many layer settings GIMP provides us with, and it essentially "screens" all the black from a layer, leaving the remaining light colors. Go ahead and create and screen a black layer over your image, and then set your paintbrush to the diameter of the bolt/light/saber you want to create. Go to the paths tool, make a path in the position and direction of the bolt, and then click "Stroke Path". Make sure you check the second series of options in the dialog box, and set it to Paintbrush.

So, now you have your line. A white, plain, relatively unremarkable line. If it's a little chunky, run a 5.0 gaussian by it before going to the Color Balance tool. In the color balance tool (still with the screened black layer selected) you can manipulate these sliders to cause various colors to be expressed in the white. In this case, I want something blue. Make sure to use all sliders availible for a thoroughly brilliant effect; shadows, highlights, and midtones.

Once you've completed your color balancing, duplicate that black layer several times over. Five should be sufficent. For each one, starting at the first and working to the last, gaussian blur each one in increasing amounts of blur. Fifteen for the first, thirty for the second, sixty for the third, one twenty for the fourth, two fourty for the fifth. But, as I've already averred in other tutorials, GIMP isn't really a precise art, so do what looks best to you. The same screening and gaussianing can also be used for fire, sparks, and holograms to add some luminosity to the mix.
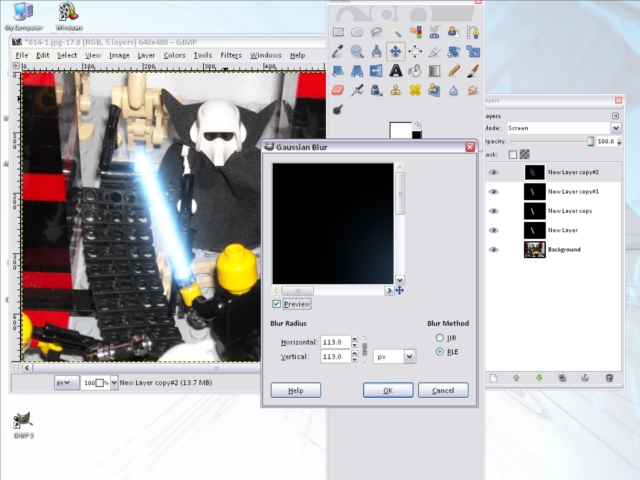
And I think we've all seen the finished product in Zeph's latest comic
Sialboats- Non-Guild Member
- Location : Florida, United States
-
Re: GIMP/Photoshop Thread
![]() by Dutch Sun Aug 30, 2009 3:04 am
by Dutch Sun Aug 30, 2009 3:04 am
Speaking of gimp here’s my newest gimp out Commander Cody.
C&C Welcomed
Dutch- Guild Member
- Age : 29
Location : Arizona
-
Page 7 of 37 • 1 ... 6, 7, 8 ... 22 ... 37 ![]()
» Photoshop Tutorial
» 7676 Republic Gunship Alternative Nose Art Project
» Official Post Your Non SWU Sig Fig Thread
» All Decal Requests & Free Decal Images
|
|
|