
GIMP/Photoshop Thread
Page 34 of 37 •  1 ... 18 ... 33, 34, 35, 36, 37
 ![]()

Rabid Squirrel- Guild Member

- Location : here

Re: GIMP/Photoshop Thread
![]() by Danester Man Fri Aug 13, 2010 6:32 pm
by Danester Man Fri Aug 13, 2010 6:32 pm

Danester Man- Guild Member
- Location : In a place.......
Re: GIMP/Photoshop Thread
![]() by Custom 333 Fri Aug 13, 2010 7:26 pm
by Custom 333 Fri Aug 13, 2010 7:26 pm


Custom 333- Non-Guild Member

- Age : 27
Location : In front of a computer.
Re: GIMP/Photoshop Thread
![]() by Darman Fri Aug 13, 2010 7:51 pm
by Darman Fri Aug 13, 2010 7:51 pm


Darman- Guild Member
- Age : 26
Location : America
Re: GIMP/Photoshop Thread
![]() by Rabid Squirrel Fri Aug 13, 2010 9:56 pm
by Rabid Squirrel Fri Aug 13, 2010 9:56 pm
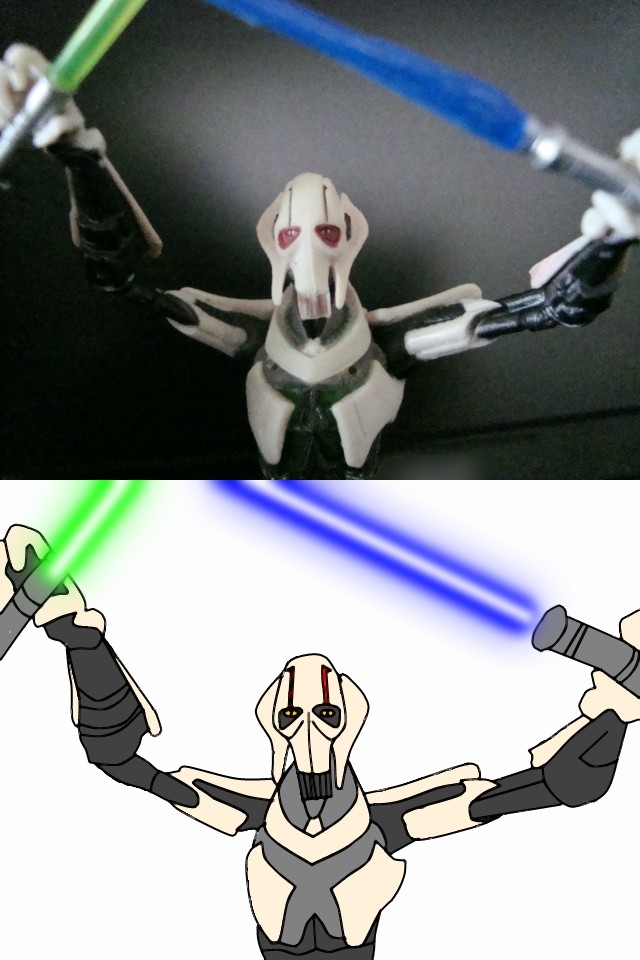
First he created a new layer. Then he 'Free Selected' around the droid. After that he found a way to evenly make an aura around the edge using either the fuzzy brush or the the regular paintbrush and then Gaussian blurring it. Once he finished that, he duplicated the layer twice or more and moved two of the duplicated layers slightly down and to the right.
As for the cut-up oval, You make a new layer, make a red oval, Gaussian blur it, reduce the opacity of the layer, use the eraser tool to make a hole in the shape similar to the outer border and then click once next to the circle where you want the edge of the red circle-piece. Press Shift to make a line and make a perfectly straight line all the way across. Repeat it twice on each of the four 'sides'.
That's how you edit the actual picture. The black part and distance meter is much easier.
Make a new layer. You use Circle Select to make a perfect circle around it. Click Select at the top of the screen and then hit invert. Use the black paintbrush to color the outside in with black. Make a new layer. Then click 'Select'>'None'. Take the paintbrush tool and pick the color purple. Find a way(increase the size of the brush) To cover up the hole and a bit more. Then take the eraser tool and increase it's size so that it was as big as the hole was and erase that much. Gaussian blur it and reduce the layer's opacity.Add a new layer. Add the text you want and the squares. Then Gaussian Blur it.
This is actually much easier done than said. I make it sound so complicated.
Rabid Squirrel- Guild Member
- Location : here
Re: GIMP/Photoshop Thread
![]() by Custom 333 Fri Aug 13, 2010 10:19 pm
by Custom 333 Fri Aug 13, 2010 10:19 pm
Custom 333- Non-Guild Member
- Age : 27
Location : In front of a computer.
Re: GIMP/Photoshop Thread
![]() by Rabid Squirrel Fri Aug 13, 2010 10:35 pm
by Rabid Squirrel Fri Aug 13, 2010 10:35 pm
Rabid Squirrel- Guild Member
- Location : here
Re: GIMP/Photoshop Thread
![]() by Custom 333 Fri Aug 13, 2010 11:55 pm
by Custom 333 Fri Aug 13, 2010 11:55 pm
EDIT: Cartoon PWNage.
Custom 333- Non-Guild Member
- Age : 27
Location : In front of a computer.
Re: GIMP/Photoshop Thread
![]() by Rabid Squirrel Mon Aug 16, 2010 5:25 am
by Rabid Squirrel Mon Aug 16, 2010 5:25 am

Rabid Squirrel- Guild Member
- Location : here
Re: GIMP/Photoshop Thread
![]() by Thunder-blade Mon Aug 16, 2010 5:55 am
by Thunder-blade Mon Aug 16, 2010 5:55 am
I was about to say "that looks a lot like Joe's work" then I read the description. Nice!


Thunder-blade- Thunder-Sharpie

- Age : 29
Location : A galaxy far, far away...
-

Rabid Squirrel- Guild Member
- Location : here
Re: GIMP/Photoshop Thread
![]() by Sergeant B Mon Aug 16, 2010 7:03 am
by Sergeant B Mon Aug 16, 2010 7:03 am


Sergeant B- Non-Guild Member
- Age : 27
Location : Turn around...

Re: GIMP/Photoshop Thread
![]() by bl*c Mon Aug 16, 2010 3:32 pm
by bl*c Mon Aug 16, 2010 3:32 pm


bl*c- Non-Guild Member
- Age : 27
Location : New Jersey
-
GIMP planet tutorial
![]() by Rabid Squirrel Mon Aug 16, 2010 5:08 pm
by Rabid Squirrel Mon Aug 16, 2010 5:08 pm
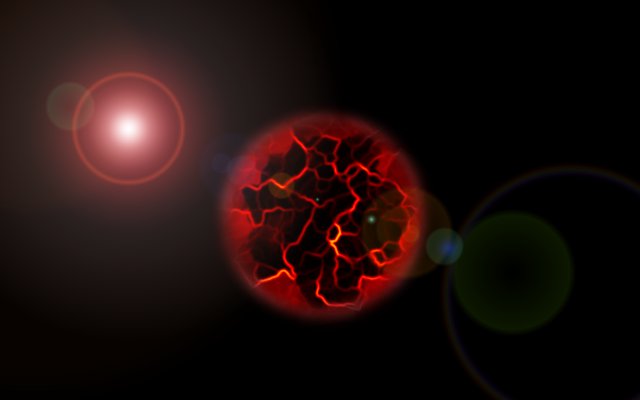
Creation Time: 5-10 minutes.

Step One: Open up GIMP.
Step Two: File>New>640x400>OK
Step Three: Layer>New Layer>name it 'planet'>OK
Step Four: Take the largest Round Paintbrush and click the paintbrush tool. Make sure the color is red. Increase the brush size to 10.00.
Step Five: Put a red circle in roughly the center of the picture. Offset it an way you like. I put it more so in the bottom right portion of the screen, but it still looks centered.

Step Six: Filters>Blur>Gaussian Blur>20-25

Step Seven: Filters>Render>Lava>Seed-26 Size-20 Roughness-15>OK

Step Eight: Select>None
Step Nine: Click the Background layer and Bucket fill it with black.

Step Ten:Right click any layer and select 'Merge all visible layers'>Leave the defaults and click Merge.
Step Eleven: Filters>Light and Shadow>Lens Flare>X Coordinate:128 &Y Coordinate: 128>OK

You're all done!
Rabid Squirrel- Guild Member
- Location : here
Re: GIMP/Photoshop Thread
![]() by Sergeant B Tue Aug 17, 2010 4:48 am
by Sergeant B Tue Aug 17, 2010 4:48 am
Sergeant B- Non-Guild Member
- Age : 27
Location : Turn around...
Re: GIMP/Photoshop Thread
![]() by Rabid Squirrel Tue Aug 17, 2010 5:14 am
by Rabid Squirrel Tue Aug 17, 2010 5:14 am
Rabid Squirrel- Guild Member
- Location : here
Re: GIMP/Photoshop Thread
![]() by Sergeant B Tue Aug 17, 2010 7:40 am
by Sergeant B Tue Aug 17, 2010 7:40 am
http://www.flickr.com/photos/51326529@N05/4900145301/
Sergeant B- Non-Guild Member
- Age : 27
Location : Turn around...
Re: GIMP/Photoshop Thread
![]() by Rijulskywalker Tue Aug 17, 2010 1:21 pm
by Rijulskywalker Tue Aug 17, 2010 1:21 pm

Rijulskywalker- Guild Member
- Location : In a galaxy far, far, away...
Re: GIMP/Photoshop Thread
![]() by Rabid Squirrel Wed Aug 18, 2010 5:07 am
by Rabid Squirrel Wed Aug 18, 2010 5:07 am
Approx. creation time: 1 min.
Final Effect:
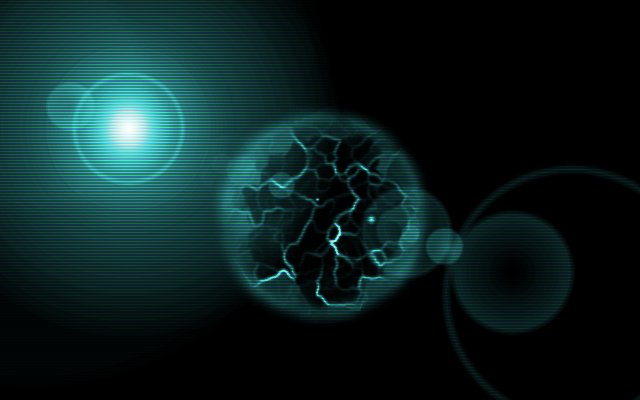
Step One: Open up any picture you want. I will open the planet from my last tutorial.
Step Two: Click Colors>Colorize-Leave everything to default. (First bar-180, second bar-50, third bar-0)
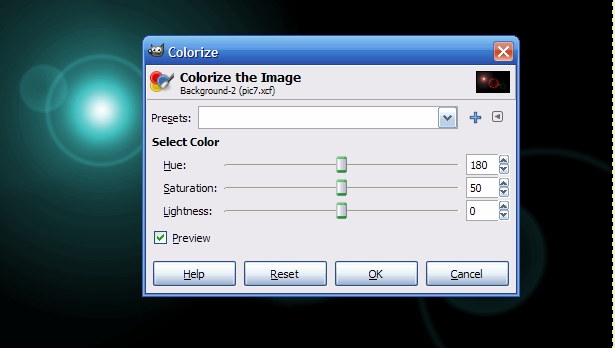
Step Three: Click Filters>Distorts>Video>Striped>OK
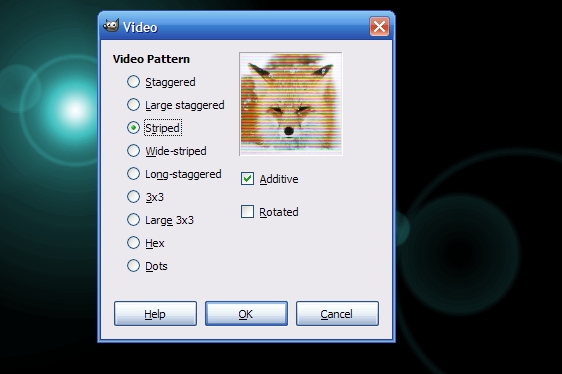
Your all done!
Rabid Squirrel- Guild Member
- Location : here
Re: GIMP/Photoshop Thread
![]() by Sergeant B Wed Aug 18, 2010 9:13 am
by Sergeant B Wed Aug 18, 2010 9:13 am
Linky
Sergeant B- Non-Guild Member
- Age : 27
Location : Turn around...
Re: GIMP/Photoshop Thread
![]() by Gerrard Wed Aug 18, 2010 4:03 pm
by Gerrard Wed Aug 18, 2010 4:03 pm


Gerrard- Guild Member
- Age : 29
Location : Somewhere to the left of the Death Star
-
Re: GIMP/Photoshop Thread
![]() by Thunder-blade Wed Aug 18, 2010 6:54 pm
by Thunder-blade Wed Aug 18, 2010 6:54 pm
There are some "pixel-y" outlines, but it's not bad.
But why the heck did you pick that toy helmet over a real looking one?
Thunder-blade- Thunder-Sharpie
- Age : 29
Location : A galaxy far, far away...
-
Re: GIMP/Photoshop Thread
![]() by Rabid Squirrel Wed Aug 18, 2010 7:43 pm
by Rabid Squirrel Wed Aug 18, 2010 7:43 pm
Yeah, it's not great, but I think it's 'okay'.
Rabid Squirrel- Guild Member
- Location : here
Re: GIMP/Photoshop Thread
![]() by Gerrard Wed Aug 18, 2010 8:29 pm
by Gerrard Wed Aug 18, 2010 8:29 pm
Thunder-blade wrote:It's not bad...
There are some "pixel-y" outlines, but it's not bad.
But why the heck did you pick that toy helmet over a real looking one?
I couldn't find a good lego clone trooper helmet that was turned like that.
EDIT: New sig!
Gerrard- Guild Member
- Age : 29
Location : Somewhere to the left of the Death Star
-
Re: GIMP/Photoshop Thread
![]() by Green Tee Thu Aug 19, 2010 3:06 am
by Green Tee Thu Aug 19, 2010 3:06 am

Last edited by Green Tee on Thu Aug 19, 2010 3:09 am; edited 1 time in total

Green Tee- Guild Member
- Age : 27
Location : Ohio
-
Page 34 of 37 • 1 ... 18 ... 33, 34, 35, 36, 37 ![]()
» Photoshop Tutorial
» 7676 Republic Gunship Alternative Nose Art Project
» Official Post Your Non SWU Sig Fig Thread
» All Decal Requests & Free Decal Images
|
|
|